

Social media is a gateway to a lasting customer relationship. Instagram may be cool choice, sure, but no doubt, Facebook is still a leading player in the world of social media marketing and an important platform for most businesses. Nearly 1.4 billion (yes, billion, with a “B”) people use Facebook on a daily basis.
1.4 billion is a huge pool of potential prospects, and exposing a portion of this audience to your business is definitely going to boost your sales. At the same time, mass awareness of your brand is created.
Joining the league of millions of brands on Facebook has become a priority for every small business. Facebook is an active hub to find and engage with potential customers. You can connect one on one, learn about user habits, and tailor ads to your audience. The informal nature of Facebook allows you to show the human side of your business. Once you get people to follow you online, you gain a steady source of leads and traffic. But before you can benefit from these features, you need to build awareness with a great Facebook business page.
Read on for a step-by-step guide to getting your Facebook business page up and running. But before proceeding further, let’s discuss some important points first
What is a Facebook Business Page?
A Facebook Business Page is a place where you can manage your brand’s presence on the largest social network in the world.
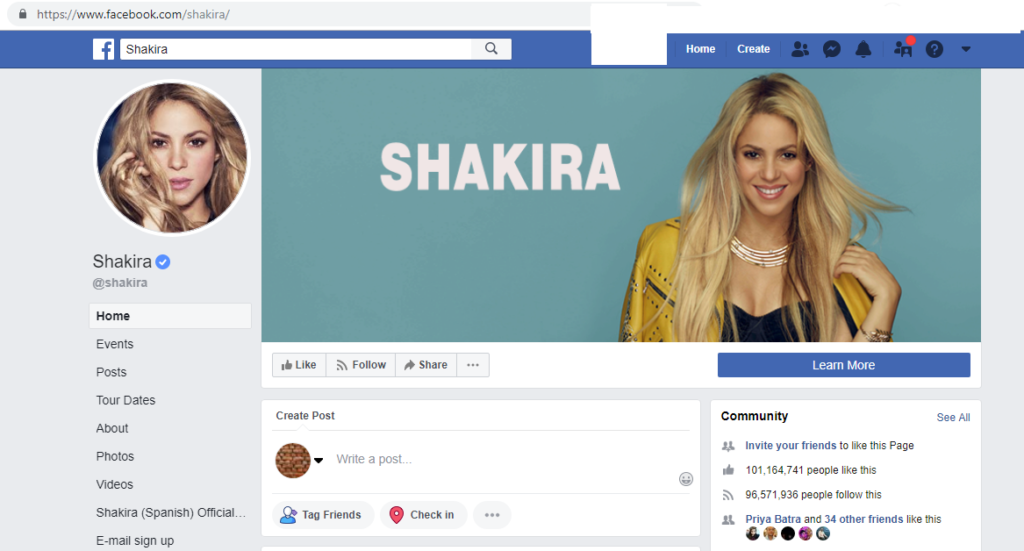
Your Page allows you to connect with your customers and nurture prospects by Sharing content, responding to customer service inquiries, collaborating with customers and other brands and having personal conversations with followers.
Can A Personal Facebook Profile be used for Business?
There are a lot of marketers who are using personal Facebook profiles for their brands, instead of an actual Facebook Business Page.
But this is not a good idea.
If you create a personal profile, you’ll have to miss a whole lot of content creation tools, analytics, and paid promotional opportunities that come with a Facebook Business Page.
Unlike profiles, Facebook has tailored Pages to your business needs. Moreover, in case of a personal profile, users would need to send you a friend request to fully engage with your brand. And you surely don’t want to make it more difficult for your customers to engage with you on social media.
So take the benefit of the power of Facebook Business Pages.
Can a personal profile be converted to a Facebook Business Page?
You can easily create a new Facebook Business Page based on your profile. Afterward, you’ll have both a profile and a Page.
Facebook will copy over your information, profile picture, and cover image. Also, you can select which friends, followers, photos, and videos to transfer to your new Facebook Business Page.
The only drawback is: Any video views or other metrics will remain with your profile and that can’t be transferred to your new Facebook Business Page.
To convert your profile to a Facebook Business Page:
- Head over to “facebook.com/pages/create/migrate”.
- Click “Get Started” and follow the on-screen instructions.
- Your new Facebook Business Page will be published once the conversion process is finished!
- For more information, check out Facebook’s help section.
Can a Facebook Business Page be created Free of Cost?
Similar to Facebook profiles and groups, a Facebook Business Page can also be created for free and can be used without any cost– regardless of how many followers or likes you have.
Even if you spend money on Facebook Ads, there’s still no charge for the organic aspects of your Facebook Business Page.
Moreover, Facebook doesn’t even charge a fee to add a storefront to your Page!
How to Create a Facebook Business Page
Step 1: Create Your Page
To get started, you need a personal account on Facebook. While you can create more than one business page, they should all link to one personal account. When logged in, click the dropdown arrow in the top right corner. Choose the “Create Page” button to visit the business section.
Facebook provides you with two Page options:
- Business or brand
- Community or public figure
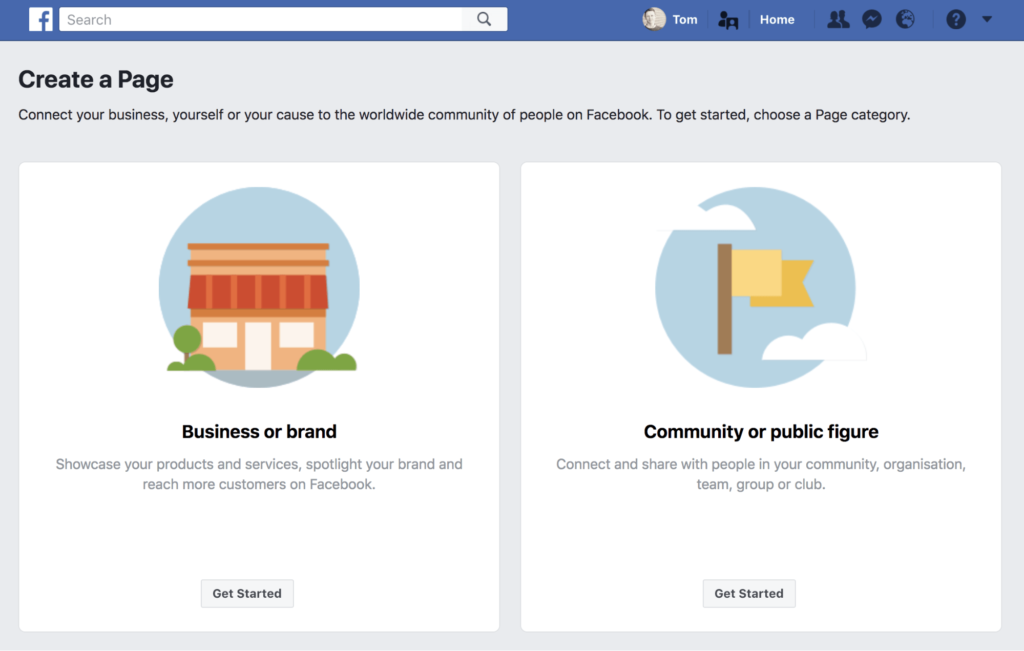
Each type of Page comes with a different set of features. Select “Business or brand,” and click “Get Started.”
And you’re done!
Next , you need to complete the basic details of your business or brand:
- Page Name
- Category
- Address
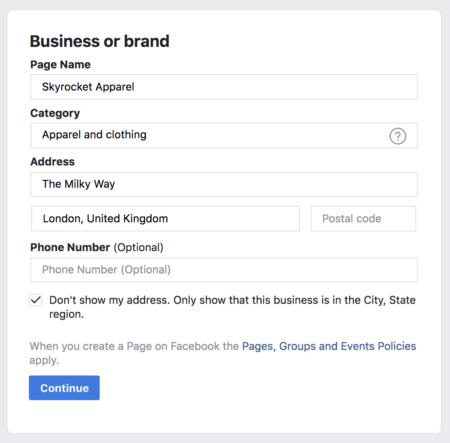
Do your best to select the most appropriate category for your business. But don’t worry, as you can always change it in the future.
If you like, you can add your business phone number. You also have the option to hide your address from Facebook users.
Once you’re done, click “Continue.”
Step 2: Add a profile photo and cover photo
Next, Facebook will prompt you to upload a profile photo and cover photo.
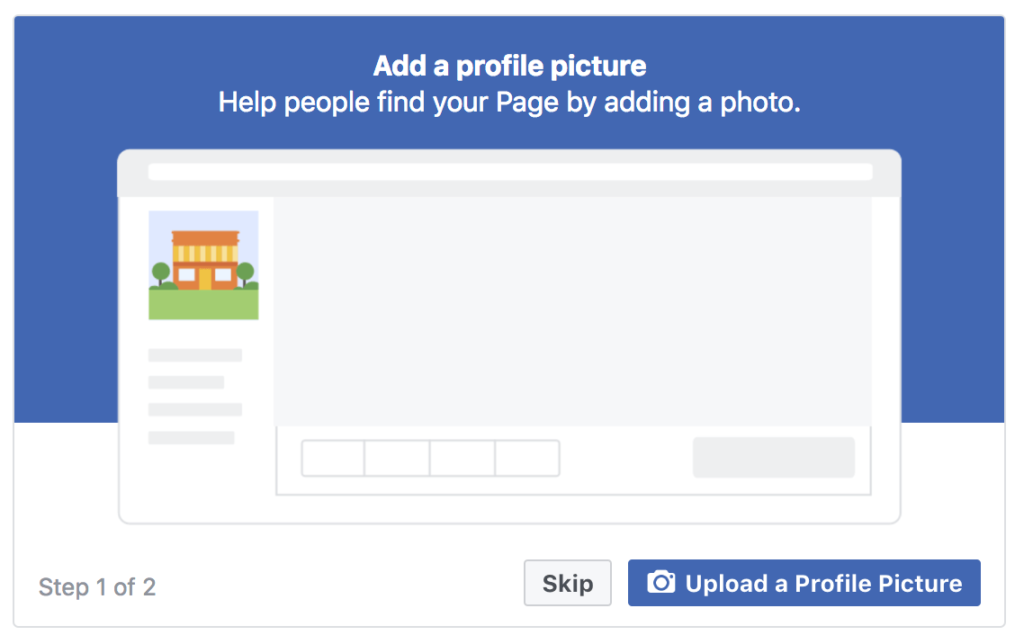
Profile photo – 170 x 170 pixels
This photo will appear as your icon every time you comment on a post or publish on the page. Ideally, you should upload your company logo here.
The ideal size for profile photo is 170 pixels wide by 170 pixels tall.
Square dimensions are best, and Facebook will crop it into a circular shape in ads and posts.
Cover photo – 820 x 462 pixels
The cover photo appears across the top of your page and is a great opportunity to show a visual element that supports your branding, draws attention, or arouse emotion from your visitors.
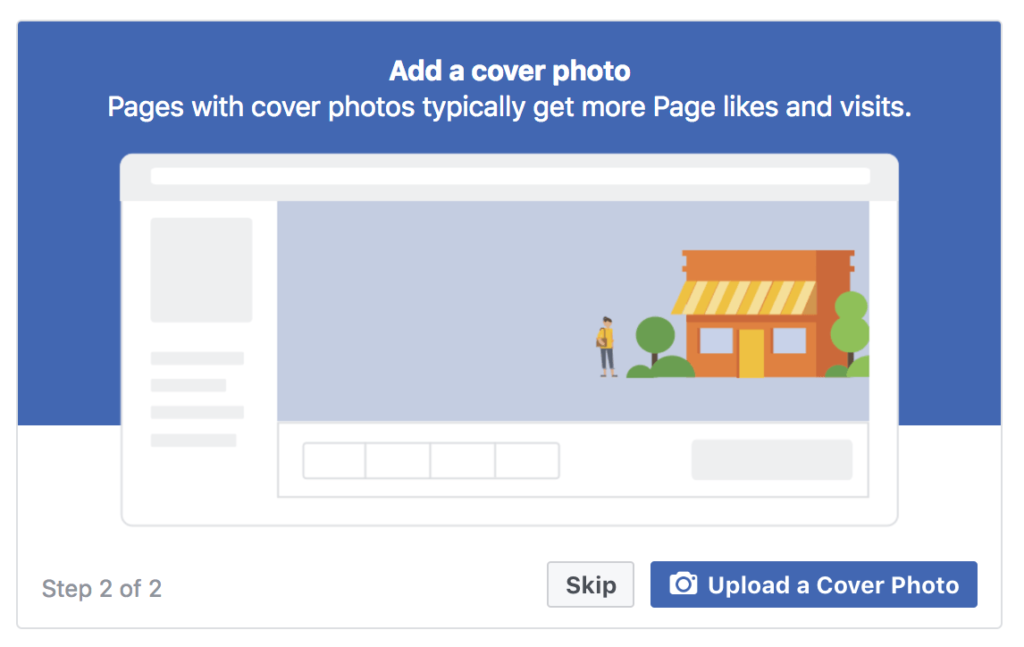
The ideal size for cover photo is 820 pixels wide by 462 pixels tall.
According to Facebook, your cover photo is displayed at different sizes on desktops and on smartphones — 820 pixels wide by 312 pixels tall on desktops and 640 pixels wide by 360 pixels tall on smartphones. If you want to use a single image that works pretty well on both desktop and mobile, I found that 820 pixels wide by 462 pixels tall seems to be the best.
You can then upload your own image to use as the background and edit the text to say whatever you’d like.
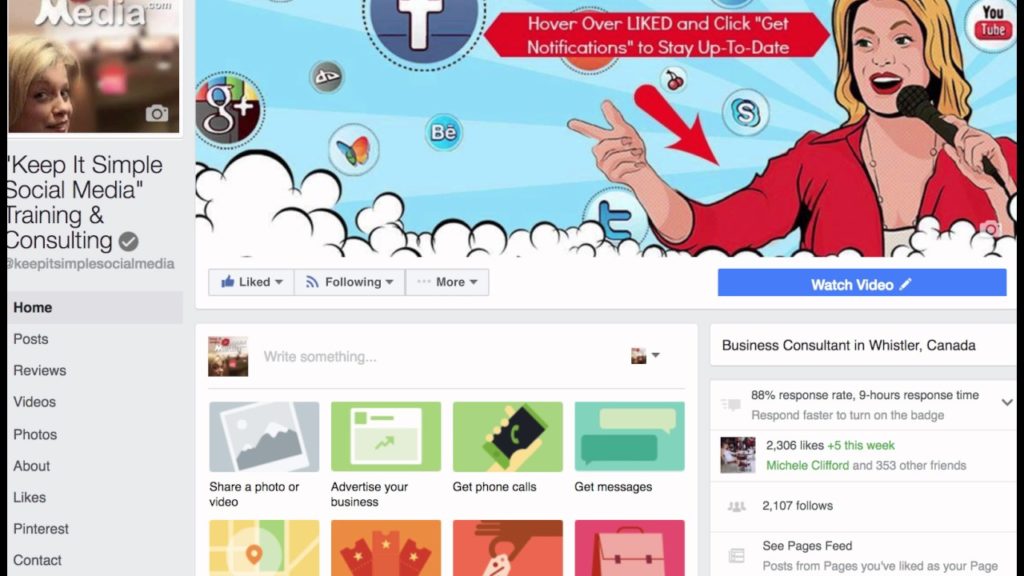
Once you have uploaded your Facebook Page’s profile photo and cover photo, you’ll be brought to your newly-created Facebook Page! Here’s mine:
(If you happen to upload an image that isn’t quite the exact dimensions of the Facebook cover photo, you can reposition the image to fit the available window. When you’re happy with the final look, you can click “Save” and you’ll be set!)
Step 3: Identify the Key Aspects of Your Facebook Business Page
Congrats, you’re now the proud owner of a Facebook Business Page!
At the top of your page, you’ll see links to the different Page management sections:
- Page: The link back to where you are now.
- Inbox: Where you can manage your messages with other users.
- Notifications: A summary of your Page’s interactions.
- Insights: Where you can track Page metrics.
- Publishing Tools: Schedule new posts and review past performance.
- Promotions: Manage and track your Facebook Ad campaigns.
Have a quick look to familiarize yourself with each of them, and then come back to your Page.
In the left sidebar, you’ll see your Page’s different tabs. And at the top-right of the page, you’ll see links to Facebook’s Help section and your Page settings.
Step 4: Learn How to Login to Your Facebook Business Page
To go back to your personal Facebook profile, just click your name or profile picture in the top blue bar.
Then, wherever you are on the platform, you can access your Facebook Business Page admin by clicking the drop-down arrow in the top-right corner of your screen.

This will bring up a list of the Pages you manage – just click the one you want to use!
Step 5: View Your Facebook Business Page Settings
Now that you’re familiar with your new Page, let’s take a look at the Settings.

Facebook gives you a variety of options:

These settings are all fairly straightforward, and you can leave most of them as they are. You can read through the settings and change anything that seems particularly relevant to your business.
Step 6: Add and Edit Page Roles
If you’d like to manage your Facebook Business Page by any other members of your team, you add them to the settings.
First, click “Page roles” in the left-hand sidebar. Then type in their name or email address to find them.
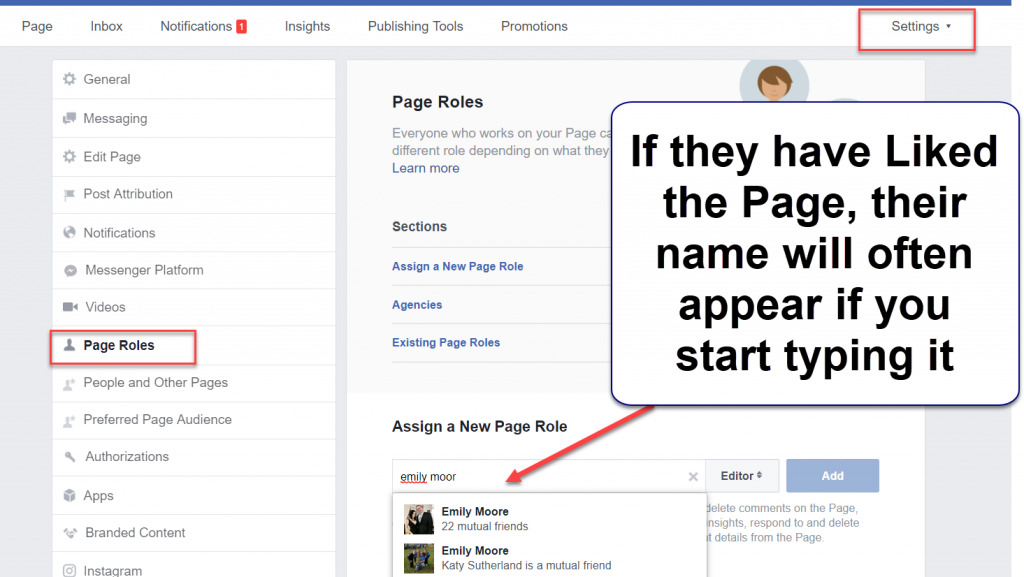
Next, Facebook’s drop-down menu provides five different Page roles for you to choose from:
- Admin
- Editor
- Moderator
- Advertiser
- Analyst
Each one allows Page managers to access and use certain features. To understand the differences, choose one of the options and read the description under the bar.
Step 7: Change Your Facebook Business Page Template
Facebook provides 10 different Page templates from which you can choose. Each one is made to best suit the needs of different organisations and individuals.
- Standard page
- Business
- Venues
- Movies
- Charity
- Politicians
- Services
- Restaurants and Cafes
- Shopping
- Video page
To access these, click “Edit Page” in the left sidebar, and then below “Templates,” click “Edit.”
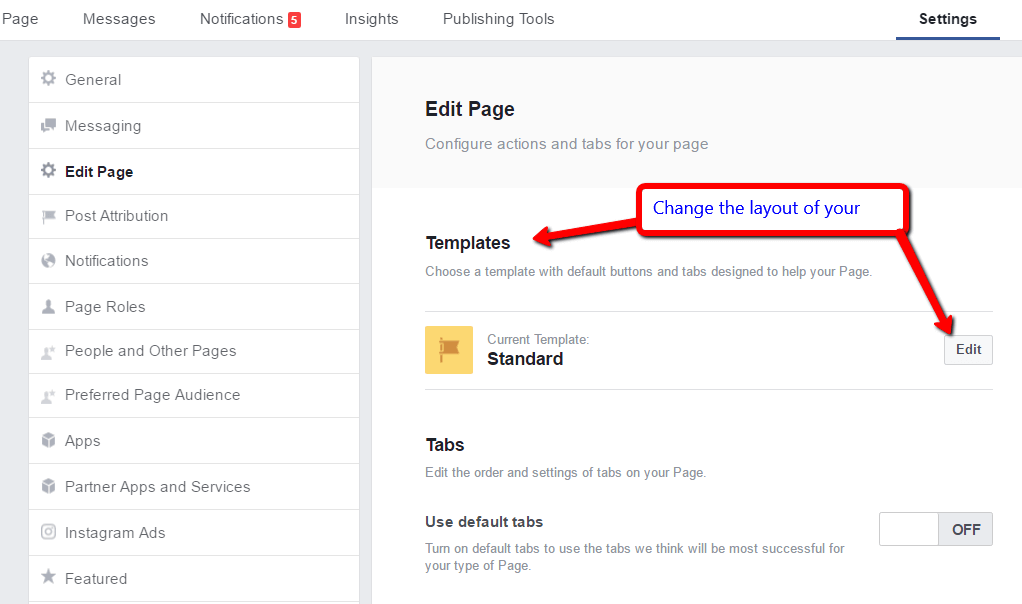
To find out more about each template, just click “View Details” as you scroll through the options.

It’s best to choose the Business template unless you have a specific reason to choose one of the others.
Once you’ve selected a template, Facebook then provides a tour to help you familiarize yourself with it.
Step 8: Add and Rearrange Your Tabs
After taking the tour, you can scroll down to see your Facebook page tabs.
Here, you can change the order of your tabs or add new ones for your specific needs.

These are the tabs that show up below your profile picture in the left sidebar of your Page.
Step 9: Create a Facebook Business Page Username
Facebook Business Pages allow you to choose a unique username to use on the site.
To set this, click the “About” tab in the left sidebar, and then click “Create Page @username.”
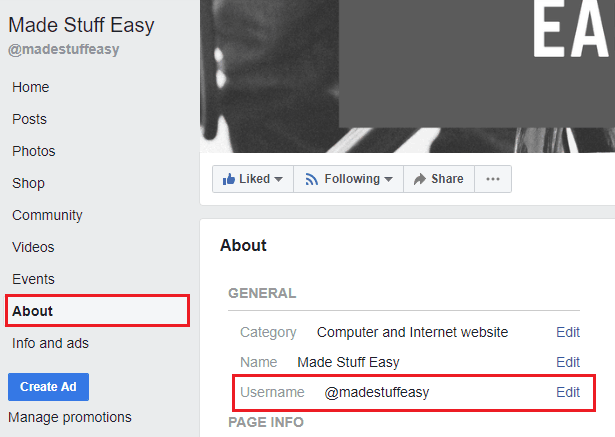
Remember, this name will be seen and used in many of your Facebook interactions. Also, it’s what people will use to tag your Page in images and posts.
You should make it very very easy for people to find you.
However, if your business name is already used by someone else, then you’ll need to get a little creative.
Remember whatever name you select , keep it simple and memorable.
Ideally, it’s best to use the same username on all of your social media profiles. This makes it much easier for your existing audience to find your other profiles and pages.

Your Facebook Business Page username must be at least five characters long and made up of numbers and letters only.
Many people have found that Facebook won’t allow them to create a Page username.
If this happens to you, they recommend adding another Page administrator to change it for you.
Step 10: Input Your Information into the About Section
Next, just input your business information in the about section.

The more information, the better.
This will help people find your Facebook Business Page.
Step 12: Add Your Story
This is showed prominently on your Facebook page in the right-hand sidebar.

To edit your story from the “About” tab, just click “Tell people about your business.”

Facebook allows you to include three elements:
- Header image
- Title
- Body text

Most brands will simply copy and paste their website’s “About Us” page to this section.
Once you’ve finished creating your Story hit “Save,” and don’t forget to publish it when you’re ready. It’s easy to make edits in the future.
Step 12: Add Your Team Members
This is an additional feature to the Page roles I mentioned earlier.
These are Page managers who also choose to have the Page appear on their personal profile, and their name and profile picture shown in this section of your page.

Why to add team members?
Well, doing so improves trust and credibility. Also, team members may promote your Facebook Business Page to their networks.
Step 13: Add a Call-to-Action Button
Don’t skip this step.
Your Page’s call-to-action (CTA) button is one of the best opportunities to capture prospects and leads.
Most Page templates will show the “Send Message” button to start.
To change this, click the pencil icon, and then click “Edit button” on the drop-down menu that appears.
Facebook provides various CTA options to choose from:
- Make a booking with you
- Contact you
- Learn more about your business
- Shop with you or make a donation
- Download your app or play your game

Once you’ve chosen your CTA button, click “Next.”

Step 14: Create Your First Post
Facebook allows you to pin one post to the top of your Page so that whenever users come to your page, it’s always the first post they see.
Facebook provides a lot of post options.
Use this opportunity to promote your current offer.
Once you’ve created your post, click the three dots indicating the drop-down menu, and click “Pin to top of page.”

You can check it’s worked by looking for the blue pin icon.

Step 15: Add Photos and Videos
Before you start promoting your Facebook Business Page, it’s best to upload some content for new viewers to see.
To add photos, simply click the “Photos” tab, and then click “Create Album.”
And for adding videos, just click the “Videos” tab and then click “Add Video.”
Step 16: Like Other Pages
So, now it’s time to get social.
Liking other pages will add their content to your Page’s News Feed.
This will enable you to engage with other Pages and attain more reach. When you interact with another Page’s post, the engagement will show up in other connected News Feeds. This is a great way to begin building your network.
Goto the Page you want to Like, and then click the three dots indicating the drop-down menu below the Page’s Cover Art.
Then click “Like as your Page.”

Facebook displays three of the Pages you’ve liked at random on your Facebook Business Page. You can see these at the bottom of the right-hand sidebar.
Step 17: Review Your Page as a Visitor
After you have finished setting up your Facebook Business Page, before sharing it , it’s a good idea to check how it appears to visitors.
Fortunately, Facebook lets you view your Page as a visitor without having to log out.
To do this, click the three dots indicating the drop-down menu, and then click “View as Page Visitor.”
To switch back to managing your page, simply click “Switch back to your view” at the top of the page.
Be sure to check it from time-to-time to test that you’re happy with how your Page appears.
Step 18: Invite Your Friends and Start Promoting Your Page!
You Page will appear more trustworthy to new followers if it already has some Likes and interactions from other people.
So to get your Facebook Business Page a good start, invite some friends to Like it by using the tool in the right-hand sidebar.
Once your friends have helped you get your Page a good start, you can link to your Facebook Business Page from your website and other profiles and start promoting it!
Conclusion
Facebook is the largest social network in the world – by far. So if you want to expand your business online, it’s worth taking the time to set up a Facebook Business Page.
And for best results, be sure to properly configure your Page.
Remember, before you start promoting your Facebook Business Page to customers and prospects, it’s very important to have some content ready-and-waiting for them to enjoy.
